Friday, February 3, 2012

DIY: Coat Buttons

It's been cold lately. Very very cold. I've been living off hot coffees and disposable heat packs and wearing 10 layers of clothes. No one told me Hong Kong winters would be like this. HAHA. Ironic, coming from a Canadian, but hey, in Canada there's something called indoor heating, which is absolutely non-existent here. So alas, I am doomed to suffer the consequences of being too cheap to buy a small portable heater because I'm stubborn and keep telling myself that the cold spell will only last a few more days so "I'll tough it out til then", only to keep waking up to the morning chills. Anyway, I did buy a coat, which I guess is a cheaper/more fashionable option to a heater.


This coat was around $20CDN (um, Hong Kong shopping = ridiculously cheap). It even came with a detachable fur collar, and you can unzip the midsection to shorten the length of the coat. The only thing I didn't like were the silver buttons - they were made of a cheap plastic and were sewn on badly. But I knew that was an easy fix and in my mind I already had big plans for this coat... big plans... <<insert evil laughter>>...

Moving right along then.

Silver has never really been my colour. I prefer gold or bronze jewelry because I find the warmer tones match better with my wardrobe. So I decided to rip off the silver buttons and replace them with gold ones. 
 I found these gold + pearl buttons in one of those alleyway markets where people set up stalls and sell random odds and ends. I love exploring quaint little markets over big commercial malls, any day. 
Of course, all I needed for this was simply a needle, thread, and half an hour. 
...I'm quite happy with the result. It's probably hard to tell from the pictures, but the new gold buttons make a really big difference and totally change the look of the coat.
Changing the buttons on a coat is so easy and it's simple DIYs like these that can improve the look of old pieces in your wardrobe.

=)


brainnnnsssssssssssssssssss....

It all started when I told some people that I got my hair cut/permed and they wanted to see pictures. I felt awkward taking one of those, you know... "Facebook profile pictures", or as they say "cam-whoring" (pardon the language, grandpa), HAHA... so since I had SKYPE on, I was just going to take a quick picture using the crappy webcam... 

but it turned into something much more...


...and in the end, I realized that I didn't even get a good picture of my hair.

HAHA.

Ohwel... I found this much more entertaining... =P

Oh and if you can identify which game the zombie is from (and actually play said game), then you are automatically in my cool books. 

Thursday, February 2, 2012

books and coffee

My new favourite pastime consists of going to a warmly-lit coffee shop, ordering a hazelnut latte, plopping myself down on a cozy armchair, and doodling on the blank covers of freshly-purchased notebooks until the barista comes over to tell me that they're closing. It's these quiet, deliciously relaxing pockets of solitude where I feel like I'm the most focused, most comfortable, and most content. So if you ever see me hunched over a notebook scribbling ferociously with a pen, don't disturb me because in the midst of my feverish sketching - I'm in my element.

By the way, did you notice that that wall of books is FAKE? It's actually just a large piece of wallpaper in a super busy mall and when that picture was taken, there were dozens of people walking around me. I took out a book from my bag and I just happened to be wearing my glasses, which adds to the scholarly look. What a poser, right? HAHA. But really, I have been reading a lot lately!


By the way, I thought of this quote after years of writing in the first few pages of a notebook then abandoning the habit, only to start up with a new notebook months later. I have notebooks for composing random song lyrics, making lengthy to-do lists, and jotting down craft ideas that never come into being. So this time, I am set on using this particular notebook from start to fini...sh. 

Wednesday, February 1, 2012

life lately

What have I been doing lately? I've been doodling on the blank covers of notebooks, sighting fat little birds everywhere I go, and hanging out with one of my favourite people for the short time we were together in the same part of the world. 


I'm back to work on Monday, but for now, I'm taking full advantage of the remaining few days where I get to sleep in until 4pm. (just kidding)... or am i?...


Monday, January 30, 2012

DIY: Colourful Rug Clutch

Here's what I made over the weekend!


...and here's HOW!

I went to a dollar store that sold home accessories and found some thick cloth rugs that were woven out of recycled jersey t-shirts. I think people in Hong Kong usually use these as door mats. For this DIY, you can always just use a thick cloth fabric of your choice. 

basic materials:
-2 cloth rugs (or thick fabric)
-felt material (or some kind of inner lining)
-thick velvet ribbon
-needle
-thread

 step 1: fold in the ends of one rug and place the black felt fabric on top. then, sew along the edges of the black felt (to conceal the rough edges of the rug). 
 it should look like this. you should have a straight edge where the rug and felt are sewn together.
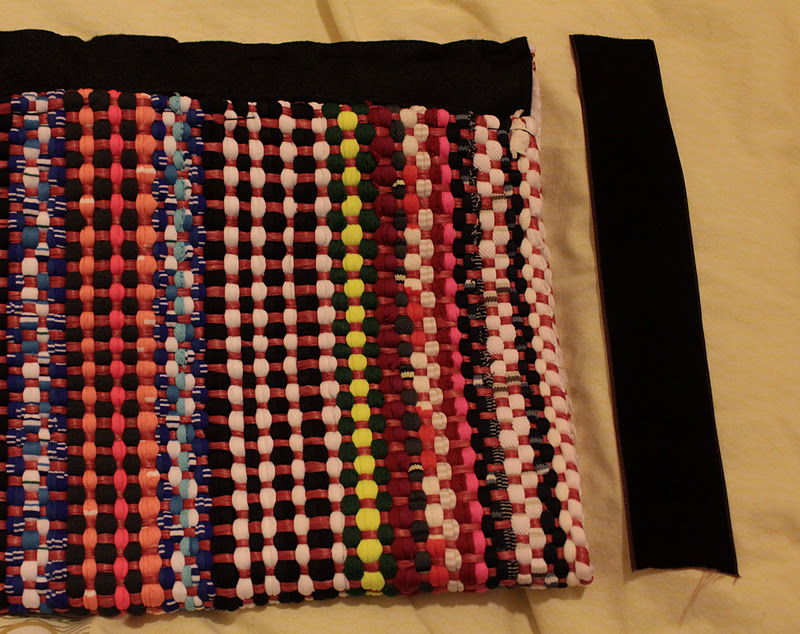
 step 2: next, fold your clutch (almost) in half. shift the top layer/half down so that the bottom half sticks out more at the top. then, cut a piece of velvet ribbon that is the same length as your clutch.
 step 3: fold the velvet ribbon in half and sew the bottom ends together. this will create a little "corner" that will make the rest of the ribbon easier to sew. hand-stitch the velvet ribbon onto the edge of your clutch (on both sides). 
 now you should have something that looks like this...
 step 4: take the other cloth rug and insert one end into the clutch. this second rug will be the outer flap.
 then, sew a straight line across, attaching the second rug to the top of the clutch.
 step 5: i wanted my clutch to have a flap that looks like an envelope, so i cut the second rug into the shape that i wanted. (however, if i were to do this again, i would sew a reinforcing line/hem before cutting, since the material started unraveling right away).
 step 6: use more of the black velvet ribbon and sew it along the edge of the envelope flap. (this will also help to cover the uneven edges). i used light pink thread to hand-stitch the edges, but you can always use a darker colour for a more subtle look. well, that's pretty much it! you could stop here...
 ...but i decided to add a few more flourishing details to finish off my clutch. i bought some black lace an interesting triangular button.
 I ended up covering my light pink stitches with a layer of the black lace and added the button at the tip of the envelope flap.

...so there you have it. a colourful clutch made out of rugs!
I also went to the outdoor market at Sham Shui Po for the first time on Sunday (they mostly sell fabrics and shady-lookin' electronic devices, wires and tools), and out of a large mountain of clothes that were selling for $3CDN, i wrestled out a bright NEON sweater that complements my rug clutch. also because i just so desperately wanted to look like a highlighter. 
Since we're on a roll, here's some more NEON for your viewing pleasure...


Related Posts Plugin for WordPress, Blogger...